
Mold After a Burst Pipe in Winter: Shutoff, Wall Cavities and the First 48 Hours
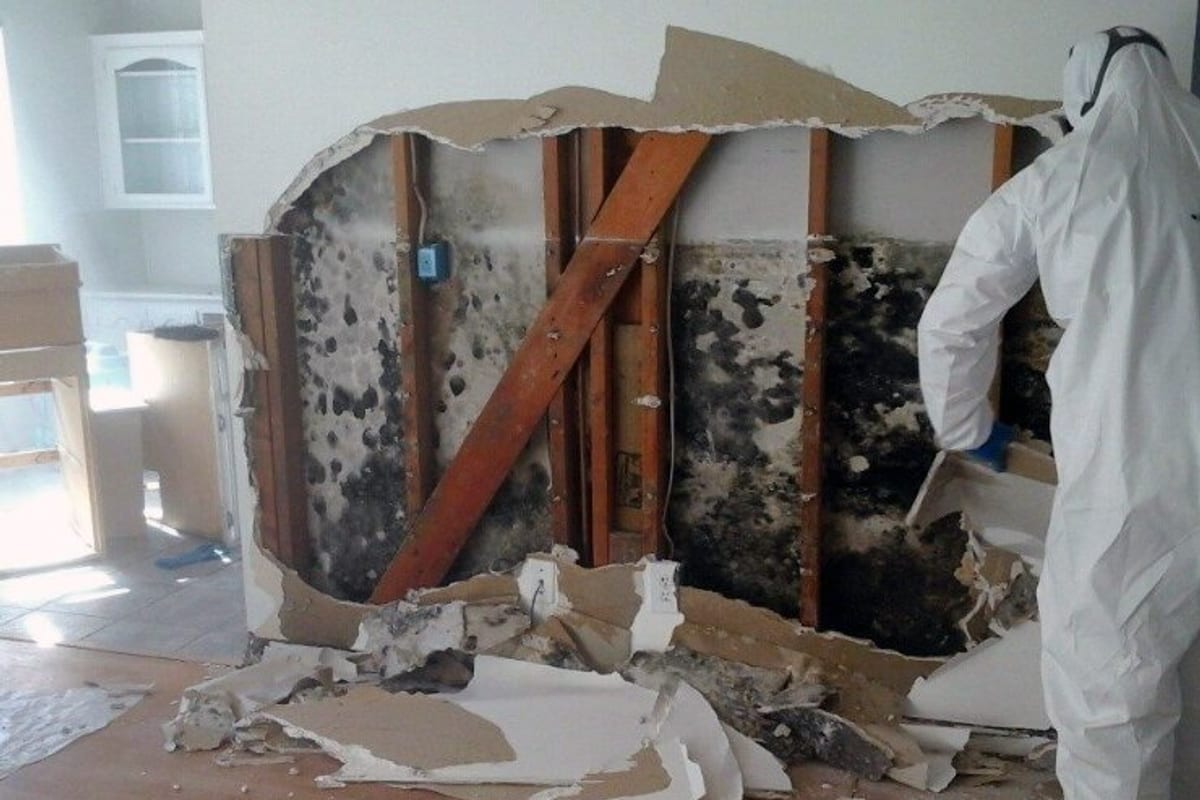
When a frozen pipe bursts, shut off the main water valve immediately, then focus on getting water out of the wall and ceiling cavities, not just off the floor, because trapped water inside walls is what turns a burst pipe into a mold problem. Mold can begin growing on wet materials within 24 to 48 hours, according to the EPA. In winter, heated houses dry slowly from the inside of walls, so cavities that look fine from the room can stay wet for weeks.
This guide covers why pipes burst, how to find the shutoff and thaw remaining frozen pipes safely, what to do in the first 48 hours that is specific to burst pipes, how to deal with wet wall cavities and insulation, how to document the loss, and how to keep it from happening again.
For general water damage steps that apply to any leak or flood, see our first 48 hours after water damage guide. This page focuses on the winter pipe problem.
Why Pipes Burst When They Freeze
Water expands when it freezes. When ice forms in a section of pipe, it blocks the line. Pressure builds in the water trapped between the ice and the closed faucet. The pipe often splits in that pressurized section, not where the ice is. That is why the burst can be several feet from the coldest spot.
Pipes most likely to freeze in south-central Pennsylvania homes:
- Supply lines in exterior walls, especially behind kitchen sinks on outside walls.
- Pipes in unheated crawl spaces, garages and porches.
- Lines running through attics or near poorly insulated rim joists in basements.
- Outdoor hose bibs that were not shut off and drained.
- Pipes near foundation vents or gaps where cold air leaks in.
- Plumbing in additions built over open crawl spaces.
A burst often is not noticed until the pipe thaws. While frozen, the ice holds the water back. When temperatures rise or the heat comes on, water pours from the split. Many burst pipe floods are discovered the morning after a cold snap breaks.
Signs a Pipe Is Frozen
- A faucet produces a trickle or nothing when the weather is very cold.
- Frost on an exposed pipe.
- A pipe that looks bulged.
- Odd smells from a drain, because water is not moving.
If you suspect a frozen pipe, keep the faucet open. Running water, even a trickle, helps melt ice and relieves pressure.
Step 1: Shut Off the Water
Know where your main shutoff is before you need it. In most homes it is in the basement where the water line enters through the foundation wall, often near the meter. In some homes it is in a crawl space or a utility closet. On a private well, turn off the well pump at its breaker and close the valve at the pressure tank.
Once the main is off:
- Open faucets on the lowest level to drain the remaining water in the lines.
- If the water heater is affected, turn off its power or gas following the manufacturer’s instructions.
- Note the time the water was shut off. It matters for the insurance record.
Step 2: Make the Area Safe
- Electricity. If water reached outlets, light fixtures, the electrical panel or appliances, shut off power to that area at the panel only if you can reach the panel without standing in water. Otherwise, call the utility or an electrician.
- Sagging ceilings. A ceiling that bulges downward is holding water and can collapse. Keep people out from under it. Do not puncture a ceiling near light fixtures or wiring.
- Slips. Wet floors on cold days can freeze near doors.
Step 3: Thaw Remaining Frozen Pipes Safely
Other pipes may still be frozen and about to burst when they thaw. Thaw them carefully:
- Open the faucet the pipe feeds.
- Apply gentle heat: a hair dryer, a space heater kept a safe distance away, or warm towels wrapped around the pipe.
- Work from the faucet back toward the frozen section.
- Never use an open flame, a torch or a propane heater on pipes. That is a fire hazard.
- If you cannot find or reach the frozen section, call a plumber.
Ready.gov’s winter weather page and the American Red Cross both offer guidance on preventing and thawing frozen pipes.
Step 4: Document Before You Clean
Insurance claims after a burst pipe often depend on what you document in the first hours. Before you move anything:
- Photograph and video the split pipe, the standing water, ceilings, walls, flooring and damaged contents.
- Photograph the thermostat setting and note the house temperature.
- Keep the broken section of pipe, or ask the plumber to keep it for you.
- Write down when you discovered the water, when you shut it off, and what you did.
- Keep receipts for emergency repairs, plumber visits and equipment.
Many homeowners policies cover sudden and accidental water damage from a burst pipe, but conditions apply. Some policies limit coverage if the home was not kept heated, or if a vacant home was not drained. This is general information, not legal advice. Policies vary, so read your policy and call your agent promptly. Our guide to whether homeowners insurance covers mold in Pennsylvania covers common policy terms.
Step 5: Get Water Out of Wall and Ceiling Cavities
Floors are visible. Walls and ceilings are where burst pipe water hides. Water from a pipe inside an exterior wall runs down the inside of the cavity, soaks the insulation and the bottom plate, and spreads along the floor framing.
What usually needs to happen
| Material | Typical action after clean-water soaking |
|---|---|
| Fiberglass batt insulation that is soaked | Remove; it holds water against framing and dries poorly |
| Drywall that is soaked or sagging | Usually removed at least above the wet line |
| Drywall that is damp but firm, dried within 48 hours | Sometimes can be dried in place with monitoring |
| Wood framing | Dry in place, monitor with a moisture meter |
| Carpet pad | Usually replaced |
| Hardwood flooring | Often can be dried with specialized equipment if addressed quickly |
| Plaster on lath | Often can be dried; check for loss of bond |
Common professional methods include cutting drywall a set distance above the visible wet line, drilling small holes at the base of walls to let air into the cavity, and running air movers and dehumidifiers. The goal is to get framing back to normal moisture levels before anything is closed up. Our moisture meter guide explains what “dry” means.
Why winter makes this harder
In winter, outdoor air is cold and dry, but the inside of an exterior wall is cold too. Cold, wet materials dry slowly. A dehumidifier and heat in the room help. Closed-up cavities with soaked insulation can stay wet for a long time.
Clean water does not stay clean
A burst supply pipe usually starts as clean water. The IICRC water damage standard notes that clean water can degrade as it sits, picks up contaminants from building materials, and warms. After a day or two, the water inside cavities may no longer be considered clean, which can change what materials should be removed. Our IICRC S520 conditions guide covers mold classification.
Step 6: Watch for Mold in the Weeks After
Even after drying, check the affected areas every week for a month or two:
- A musty smell in the room or the basement below.
- Staining or spotting on baseboards, drywall or ceilings.
- Peeling or bubbling paint.
- Warped baseboards or flooring.
- Moisture readings that climb back up.
If you see growth on drywall or insulation, or it covers more than about 10 square feet, that is usually a job for professional containment and removal. See signs of mold behind drywall.
Preventing the Next Burst Pipe
- Insulate pipes in exterior walls, crawl spaces, garages and attics with foam pipe sleeves.
- Seal air leaks near pipes: rim joists, foundation vents, gaps around pipe penetrations.
- Shut off and drain outdoor hose bibs each fall, or install frost-free hose bibs.
- Open cabinet doors under sinks on exterior walls during cold snaps so room heat reaches the pipes.
- Let a faucet drip on very cold nights for pipes that have frozen before.
- Keep the heat on if you travel. Do not set the thermostat too low.
- Consider a smart leak detector or automatic shutoff valve for a second home or rental.
If the house will be empty in winter, see preventing mold in vacant and second homes.
Frequently Asked Questions
How fast does mold grow after a burst pipe?
Mold can begin growing within 24 to 48 hours on wet materials, according to the EPA’s Brief Guide to Mold, Moisture and Your Home. Wall cavities and insulation that stay wet are the most likely places for growth after a burst pipe.
Can I just dry the wall with fans?
Fans dry surfaces. They do not reach soaked insulation or framing inside a closed wall very well. If the cavity got soaked, opening or venting the wall and removing wet insulation is usually needed. A moisture meter tells you whether it is working.
Does insurance cover mold after a burst pipe?
Coverage depends on the policy. Many policies cover sudden water damage from a burst pipe, and some include limited mold coverage tied to a covered water loss. Exclusions and sublimits are common. This is general information, not legal advice. Read your policy and contact your insurer quickly.
Should I turn up the heat to dry things out?
Moderate heat helps, especially paired with a dehumidifier. Very high heat without moisture removal can raise humidity in the house and spread moisture to other rooms. Keep the area warm, run dehumidifiers and remove wet materials.
Burst Pipe Damage in Your Home?
If a pipe has burst and water reached walls, ceilings or insulation, our water damage and mold restoration service can open and dry affected areas and remove materials that have started to grow mold. Contact us or call (717) 256-4434 to schedule a visit in Gettysburg or nearby.